- レシピ
ビーガンパイ生地
Vegan Puff Pastry
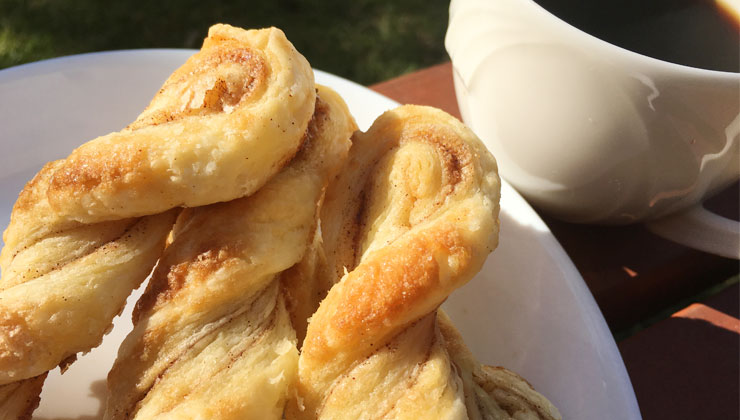
これぞ本当のパイ生地!もし時間がたっぷりあるのであれば、ぜひチャレンジしてみてください。作るのは少し大変かもしれませんが、とっても美味しくて見栄えも綺麗なパイ生地をヴィーガン仕様で作ることができます。写真は、シナモンとお砂糖をまぶしたツイストパイにしていますが、もちろんアップルパイやデニッシュなど様々なメニューに使用可能です。
This is the real deal when it comes to pastry. You will need plenty of time, a cool kitchen and neatness is an added bonus. All your hard work will be rewarded with a beautiful, buttery, flaky pastry that you can enjoy sprinkled with cinnamon and sugar as I have done for the photos or for apple pies or danish pastries – whatever you prefer!
材料
Material
作り方
まずは基本となる生地から作ります。ボウルに有機無漂白小麦粉と塩を入れ、大さじ2程度のプラントベース・有機ブロックを指先で潰しながらポロポロとなるまで加え混ぜます。
ゆっくりと少しずつ冷水を加え、生地を捏ねます。まとまってきたらボール状にして濡れ布巾で包み、冷蔵庫の中で寝かせます。
次は、バターのレイヤーを作ります。ベーキングペーパーの上に残りのプラントベース・有機ブロック(よく冷やしたもの)を乗せ、もう一枚のベーキングペーパーを上から被せて、麺棒と手で厚さが約1cm程度の大きな長方形になるように伸ばしていきます。伸ばせたら冷凍庫に入れてよく冷やします。
生地もバターもよく冷えたら、生地を伸ばしていきます。(しっかりと冷えてからでないと、溶けて大変なことになります!)
生地は、バターの幅よりも少し大きめ且つ長さは約2倍になるように伸ばしてください。生地の片方に寄せるようにバターのシートを乗せ、もう半分を折りたたんでください。縁を指で摘んで閉じ、バターが飛び出してしまわないようにしてください。
なるべくキレイに気をつけながら工程を踏むことが、あとで層を増やす際にベタベタにならないためのコツです。
生地を長細い長方形になるように麺棒で伸ばし、1/3の長さを折り込み、残った1/3もその上に折り畳みます。開いている2辺を指で潰し、90°回転させて、細長い長方形になるよう再度麺棒で伸ばしていきます。先ほどと同じように折りたたみ、2辺を指で潰すところまで行ったら、濡れ布巾に包み、冷蔵庫で30〜60分寝かせます。(くどいようですが、しっかりと冷やしてください!)
生地が全体的に冷えたら、先ほどと同じ伸ばして折りたたむ工程をさらに2回繰り返し、濡れ布巾に包んで冷蔵庫で30分寝かせます。もしも、ベタベタしてきたら(私のもベタベタになりましたが、美味しくできました!)小麦粉を麺棒や手、台の上にまぶして作業を進めていけば問題ありません。
伸ばす・畳むの工程をさらに2度繰り返したら、最後にもう30分冷蔵庫で休ませます。(ここまでで合計6回、伸ばす・畳むの工程を行ったことになります)
生地が完全に冷えたら、あとはお好みのパイ・デニッシュにしてください。もし、ここまでで時間がなくなってしまった場合には、生地をラップに包み直し、冷蔵庫で一晩置いておいたり、冷凍庫に入れて3ヶ月間程度保存することが可能です。
Recipe
The first step is to make a basic pastry dough. Lightly rub about 2 Tbsp of the block into the flour and salt to make a breadcrumb consistency.
Slowly add the water and gently draw in the flour to make a soft dough. Shape into a ball, wrap with a damp towel and leave to rest in the fridge.
Next you need to make a layer of butter. Take the rest of the Naturli block (ensuring its very cold before you start) and place between two large pieces of baking parchment. Using a rolling pin and your hands to shape, bash out a large rectangle, about 1cm thick. Place into the freezer to cool again.
Once both your dough and butter are thoroughly cold (don’t rush this – warm butter will be a disaster) roll out the dough into a rectangle slightly wider than the ‘butter’ and twice as long. Place the ‘butter’ on the bottom half of the dough and fold the top half down to cover it. Pinch the sides shut to stop the ‘butter’ escaping. Being neat and careful will avoid a sticky mess in later folds.
Roll out your pastry/’butter’ sandwich into a long thin rectangle. Fold the top third down to the middle, then the bottom third up to cover it, making three layers. Pinch the sides shut. Rotate 90 degrees, roll out into a long rectangle again, fold in the same way, pinch sides shut, then cover with the damp towel and put back into the fridge for at least half an hour (again, don’t be tempted to rush).
When your dough is thoroughly cool again repeat the process of rolling out and folding twice more, wrap the dough and cool for another half an hour. If things start to get sticky (and they did for me, so don’t panic; you’ll still have great pastry), sprinkle flour lightly on your worksurface, hands and rolling pin. Then roll out and fold twice more before it’s final half hour in the fridge. You’ll have done six triple folds in total.
Once the dough is thoroughly cool again it is ready to use in your pie or pastry of choice. If you’ve run out of time by this point you can also wrap the dough tightly in cling film and leave in the fridge overnight, or freeze for up to 3 months.


